Grinding and Testing of Telescope Mirrors – Part 3
Tech info | July 16, 2022
Polishing
Polishing is the final stage of processing the mirror in which the surface takes its exact geometric shape with a finished mirror appearance. Microroughnesses decrease in size almost 1000 times, from a few µm to a few nm, and become comparable to the size of the atoms. At the atomic level, the process is still not well understood. It is assumed to be a combination of scratching the oxide layer formed on the glass surface by the particles of the polishing mixture and the micro smearing of the roughness by sliding the atomic layers as a consequence of the rubbing [4].
The process continues with the preparation of a polishing tool – a polisher. It is again a cement cast coated with epoxy resin and a curvature corresponding to the curvature of the concave glass. On its working surface, the polisher is covered with a thick layer (5 – 10 mm) of a special polishing compound called optical resin, which is basically a mixture of rosin, pitch, and a small quantity of beeswax. Pitch is obtained during the distillation of tar (coal or wood) with subsequent separation into a solid fraction (pitch) and liquid (creosote oil). The latter is used for the impregnation of wooden parts, such as railway sleepers, etc. In optics, a wood pitch is preferable.
The resin is prepared by melting and mixing the components over low heat until the mixture is completely homogenized [3]. It is important that the mixture does not boil because it burns very quickly and loses its polishing capabilities. In the resin layer on the polisher working surface, with the help of a hot soldering iron (or similar tool), grooves are cut to form a square grid in the same way as in the case of grinder preparation.
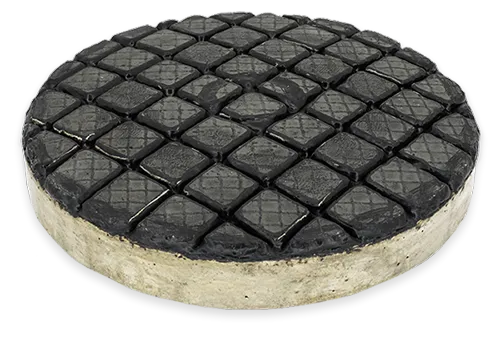
The most important quality of an optical resin is its ability to flow. Literally! Although solid in appearance, it is a liquid of enormous viscosity. The individual polishing squares of the grid work independently and make the resin follow the curvature of the glass surface with extreme precision. Thus, the surface is not only entirely polished but its precise geometric shape is achieved. Another important property is that the resin allows the particles of the polishing mixture to dig into it and thus polish the glass.
A water mixture with some inorganic oxides serves as a polishing substance. The most used are cerium oxide (CeO2) or ferric oxide (Fe2O3), also known as red rouge. Cerium oxide polishes faster, but feric oxide ensures the best quality of the optical surface and is preferred in the final figuring stages of mirror polishing.
The movements of the polishing tool over the mirror (or mirror over the polishing tool) are smooth and easy, oval in shape, with the two parts continuously rotating relative to each other. The sound of the polishing process is quiet and gentle, similar to a slight whistling, and as opticians like to say, the mirror is singing
. The surface is periodically checked using a small microscope until all tiny holes and scratches of the grinding mat vanish entirely. When the polishing finishes and the glass surface is shiny, the last stage of the process begins – the figuring stage.
Figuring
This stage aims to bring the mirror surface to the final geometric profile. In mutual rubbing with oval movements, the surface tends to assume the shape of an ideal sphere since it has the same radius of curvature for all radial zones relative to the axis of symmetry. Ideally, this works out on its own, but in reality, it doesn't always. The mirror surface turns out to be composed of zones of different curvatures. Therefore, some zonal corrections have to be made. At this stage, polishing goes hand-in-hand with checking the surface by optical methods, as described in the next part.
Zonal corrections are made either by retouching (scratching) the surface of the polisher to change the polishing speed for that area or by a small polisher moving only in a given zone [2][4][5]. Now, it is mandatory to polish only for a short period spending much more time on tests and analysis before the next figuring step, etc. For example, when manufacturing large optical mirrors, the working cycle is as follows. It is locally polished for about 10-20 minutes, and the mirror is left to temper for a day, in other words, to equalize the temperature in the entire glass volume. The next day is dedicated to testing the surface, and in the next few days, the team of specialists discusses the results and decides how to proceed further. And so, after a week, the cycle repeats again. This stage lasts for months and even a year. That is quite understandable considering the fact that in just a few minutes of improper polishing, many weeks of work can fail, and the process can go back to a much earlier stage [1][6].
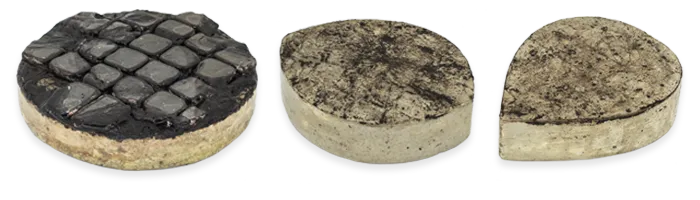
The figuration stage is responsible for correcting the zonal errors and giving the final exact geometrical shape to the surface. Aspherical mirror profile coincides with one of the conic sections – ellipse, parabola, or hyperbola. Therefore, it is necessary to smoothly change the radius of curvature for the individual radial zones. In this case, there are two approaches: either the resin layer is formed under an appropriate template so that it polishes at a different speed in the individual zones, or a separate small polishing tool with a specific shape is made having the same purpose. The figure below shows both cases.
As we mentioned before, figuring is the most important step and requires a lot of calmness, patience and thinking. For many people diving into this skill, this stage is more of a mystery than an exact science and based on our experience, we should agree. It often happens that after little zonal polishing, contrary to all logic, the result is opposite of what we expected or even completely different. But unfortunately, this is the reality, and if we want to succeed, we must be prepared for all sorts of surprises.
On the other side, mirror testing methods rest on a rigorous scientific basis. There is a wide variety of approaches and techniques for testing optical surfaces. In the last part of the series, we will describe some original methods of testing aspherical mirrors developed by us and used in our practice.
Read more about the history of telescope making and the development of optics.
Reference
- Pacini et al.
Optical telescopes of the future
, ESO Conference, Geneva, 1978. - Максутов Д.
Изготовление и исследование астрономической оптики
, Наука, 1984. - Навашин М.
Телескоп астронома-любителя
, Наука, 1979. - Наумов Д.
Изготовления оптики для любительских телескопов-рефлекторов и ее контроль
, Наука, 1988. - Сикорук Л.
Телескопы для любителей астрономии
, Наука, 1982. - Щеглов П.
Проблемы оптической астрономии
, Наука, 1980.